
The short version
How does a French drain get installed in NC clay?
Eight steps: layout and daylight confirmation, trench to depth, trench-wall prep (NC-specific), fabric or no-fabric decision, pipe placement, #67 stone column, backfill in compacted lifts, and a 48-hour rain-check. Two of these -- trench-wall prep and the rain-check -- separate NC-calibrated installs from national-template work.
How do I know if my contractor is cutting corners?
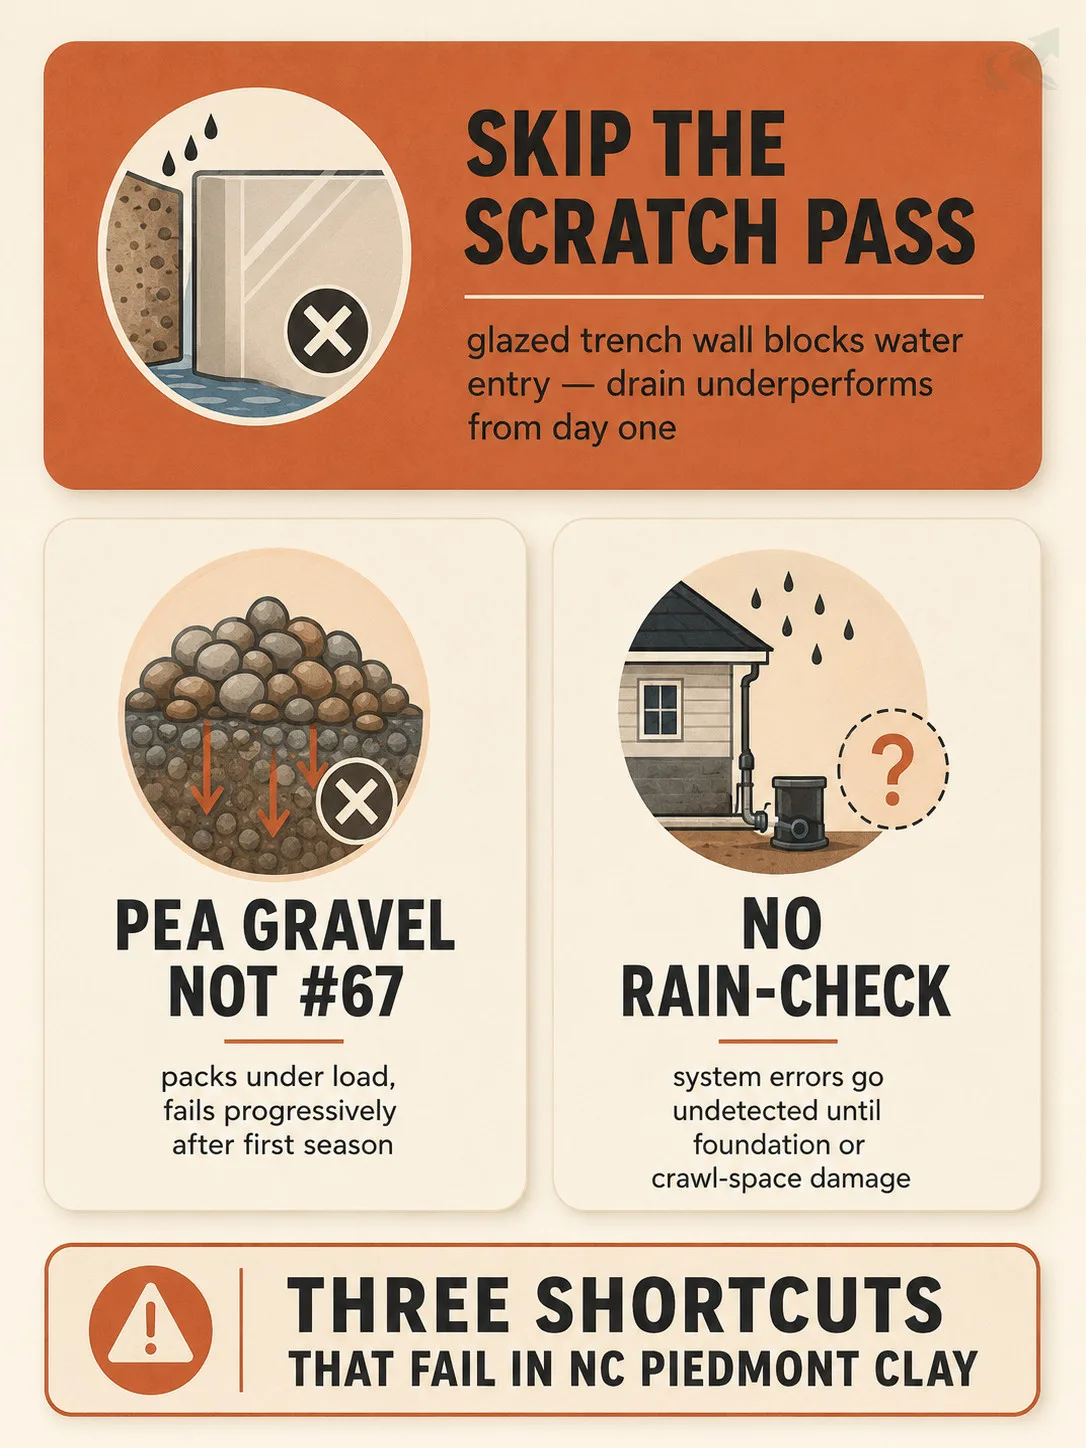
Three red flags: no scratch pass on the trench walls before stone goes in, pea gravel or river rock in the stone column instead of #67 crushed stone, and no post-storm site visit after the first rain. Ask about all three before the crew starts.
The crew shows up Monday. You signed the quote last week. You have no idea what a good install looks like from outside the trench.
That’s the situation most NC homeowners are in. The problem is not ignorance — it’s that no one has explained the process in a way that lets you recognize whether your contractor is doing it right or cutting corners.
This page fixes that. By the end, you will know the eight steps of a properly installed French drain in North Carolina Piedmont clay, which two steps are NC-specific and routinely skipped, and exactly what to look for while the crew is working.
Step 1: Layout and Daylight Confirmation
Before a shovel touches the ground, the discharge point — where water exits the system — must be confirmed. If there is no natural daylight point, the system needs an engineered outlet.
Every French drain needs somewhere to send the water it collects. That somewhere is called the daylight — an open-air discharge point where water exits freely, usually at a downhill property edge, a swale, a ditch, or a storm drain connection.
If your contractor walks the property and stakes a trench line without first confirming where the water goes, that is the first red flag. A drain with no confirmed outlet either backs up, exits onto a neighbor’s property, or discharges against a foundation.
What to ask before layout begins: “Where is the daylight point, and can you show it to me?”
A legitimate contractor will walk you to it. They will also confirm the discharge is not pointed at a structure, a septic field, or a low area that will just re-flood. In North Carolina, discharging to a neighbor’s property without an easement is a trespass issue — not a contractor problem you want to inherit.
Step 2: Trenching to the Right Depth
Depth depends on the application — 18 inches for a standard yard intercept, 24 inches or more for foundation drainage in NC clay.
Underdepth trenches are the most common installation failure across the NC Piedmont. A crew working fast will dig 10 to 12 inches and call it done. That depth works in sandy coastal soil. It does not work in red clay.
NC Piedmont clay sits in horizontal layers. Water percolates slowly through those layers and tends to travel laterally along the clay face before moving downward. A shallow trench intercepts only the uppermost layer. The water routes around it.
See the full depth breakdown for each application type at French drain depth by application NC.
What to ask before digging starts: “What depth are you targeting, and how does that change if you hit the B-horizon clay?”
A contractor who has worked Piedmont clay knows the horizon question. One who has never left sandy soil will look at you blankly.
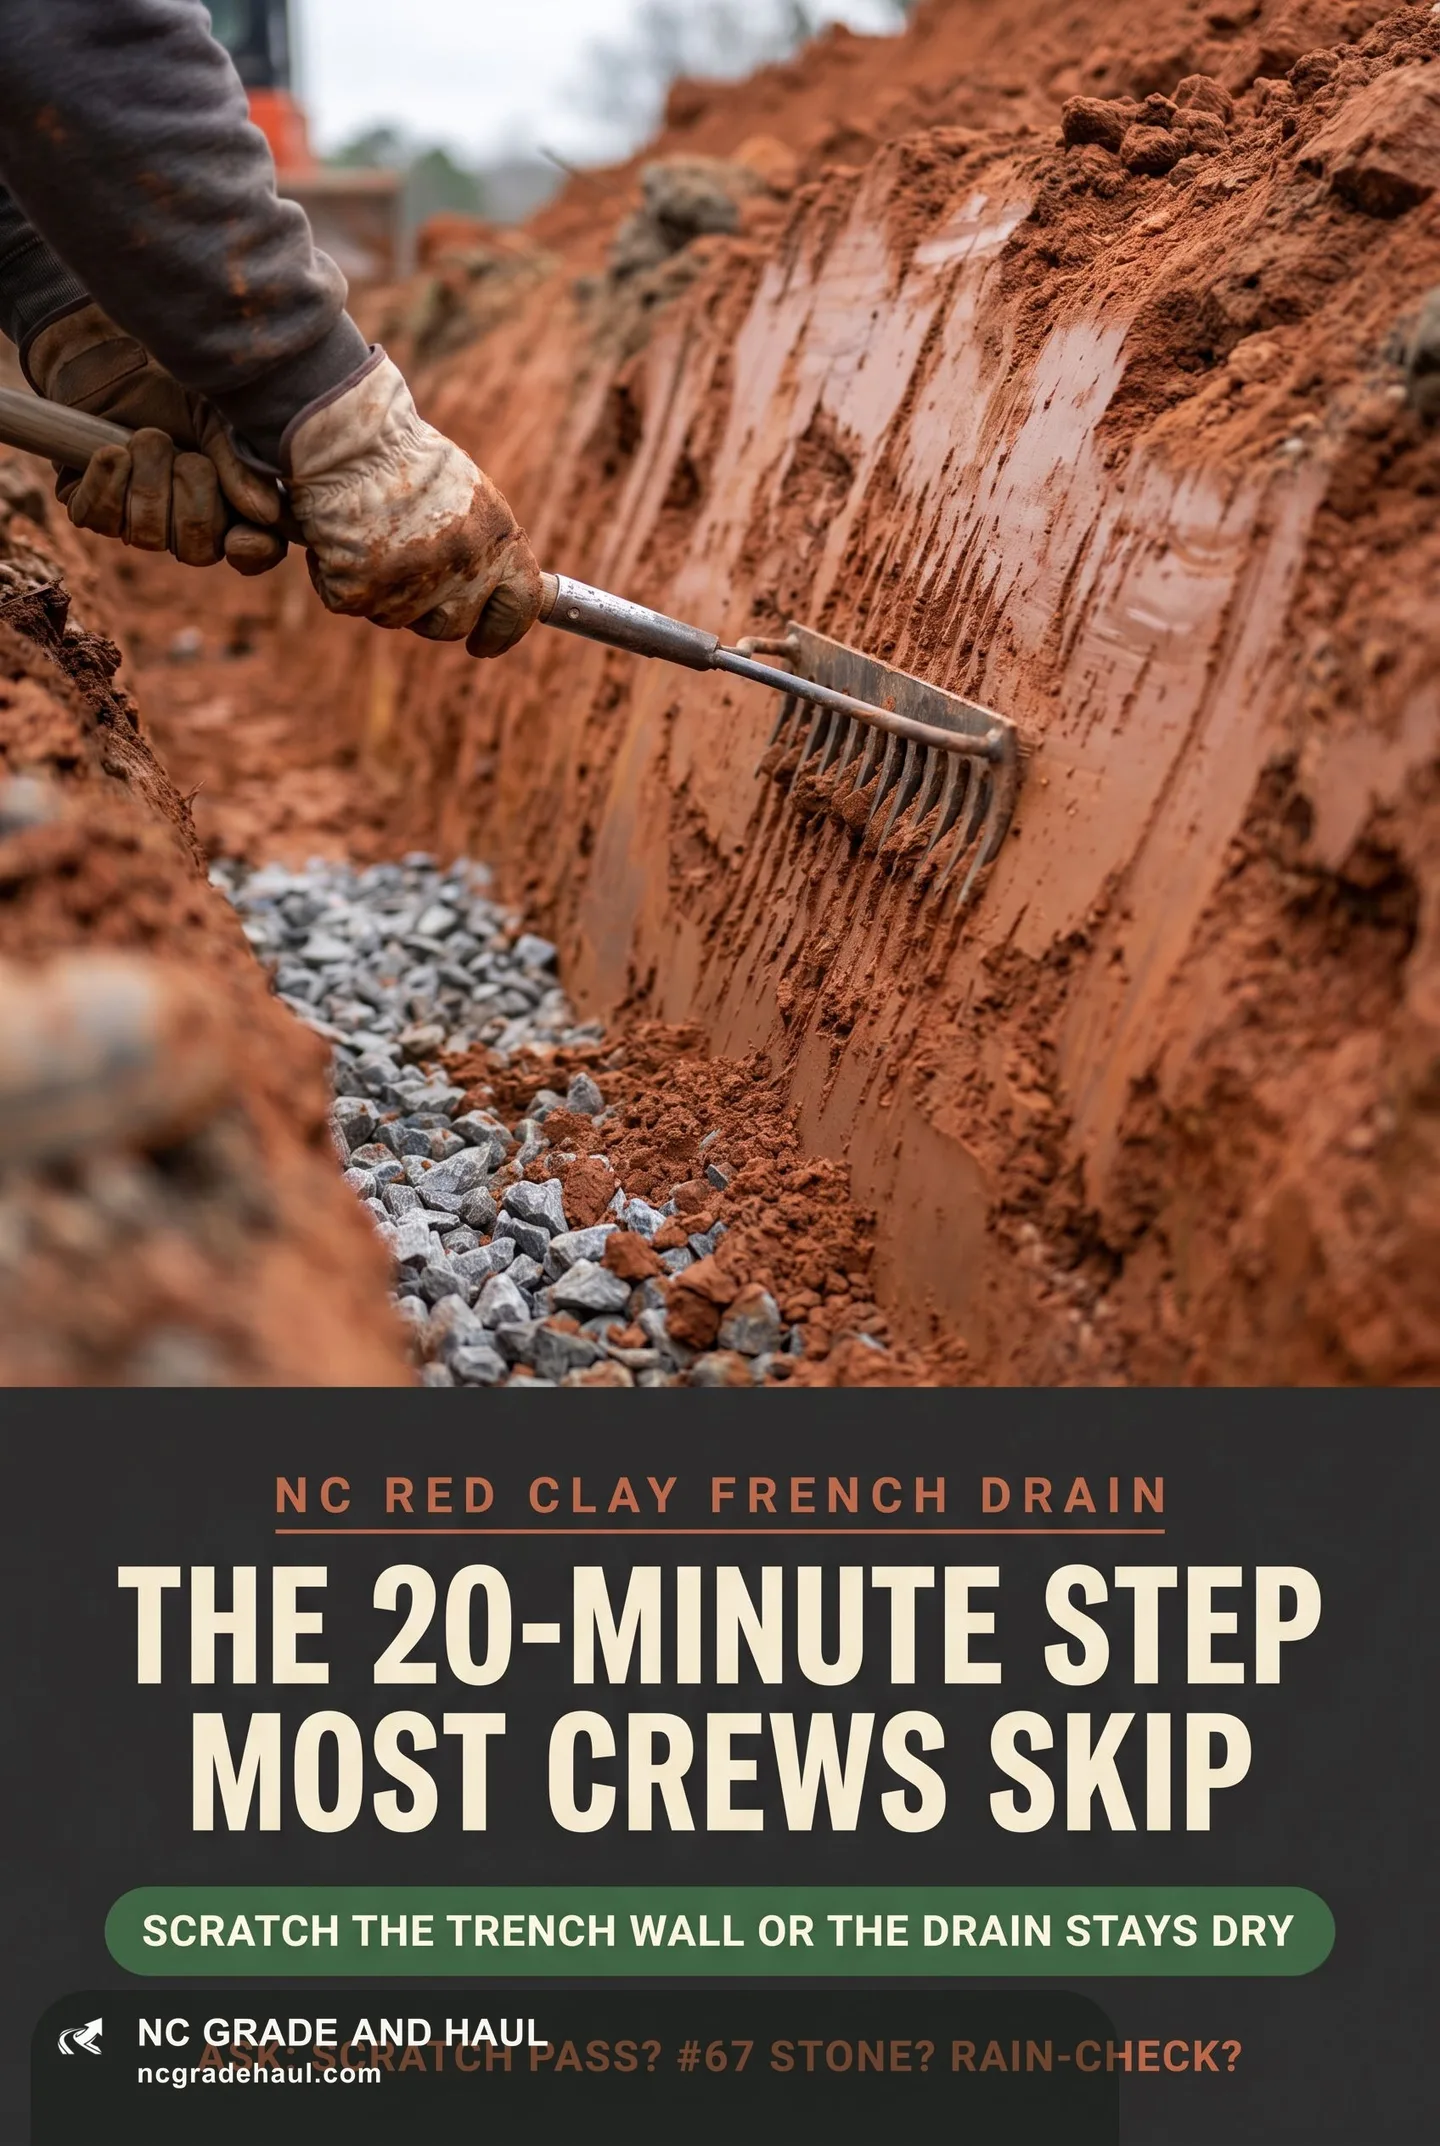
Step 3: Trench-Wall Prep — The NC-Specific Step
Excavator buckets glaze the clay trench wall into a near-impermeable surface. A scratch pass breaks that glaze and restores water entry. Most national-template crews skip this.
When a trackhoe bucket drags through red clay, it smears the cut face. The clay particles compress and align into a slick, low-permeability skin. Engineers call this glazing. It is the same principle as puddling clay to seal a pond.
A glazed trench wall means the clay immediately adjacent to the stone column cannot pass water into the drain. The #67 stone column sits in a cylinder bounded by sealed walls. Water travels along the surface of the clay, reaches the top of the stone, and short-circuits out the top of the trench instead of passing through into the pipe.
The fix is a scratch pass — a hand tool or a toothed blade dragged along the trench wall before stone goes in. It breaks the glaze, opens the clay pores, and restores lateral water entry into the stone column.
This step adds roughly 20 minutes to a standard residential install. Most national YouTube tutorials and generic drainage manuals do not mention it because it is not a significant factor in sandy or loamy soils. It is a significant factor in North Carolina Piedmont clay.
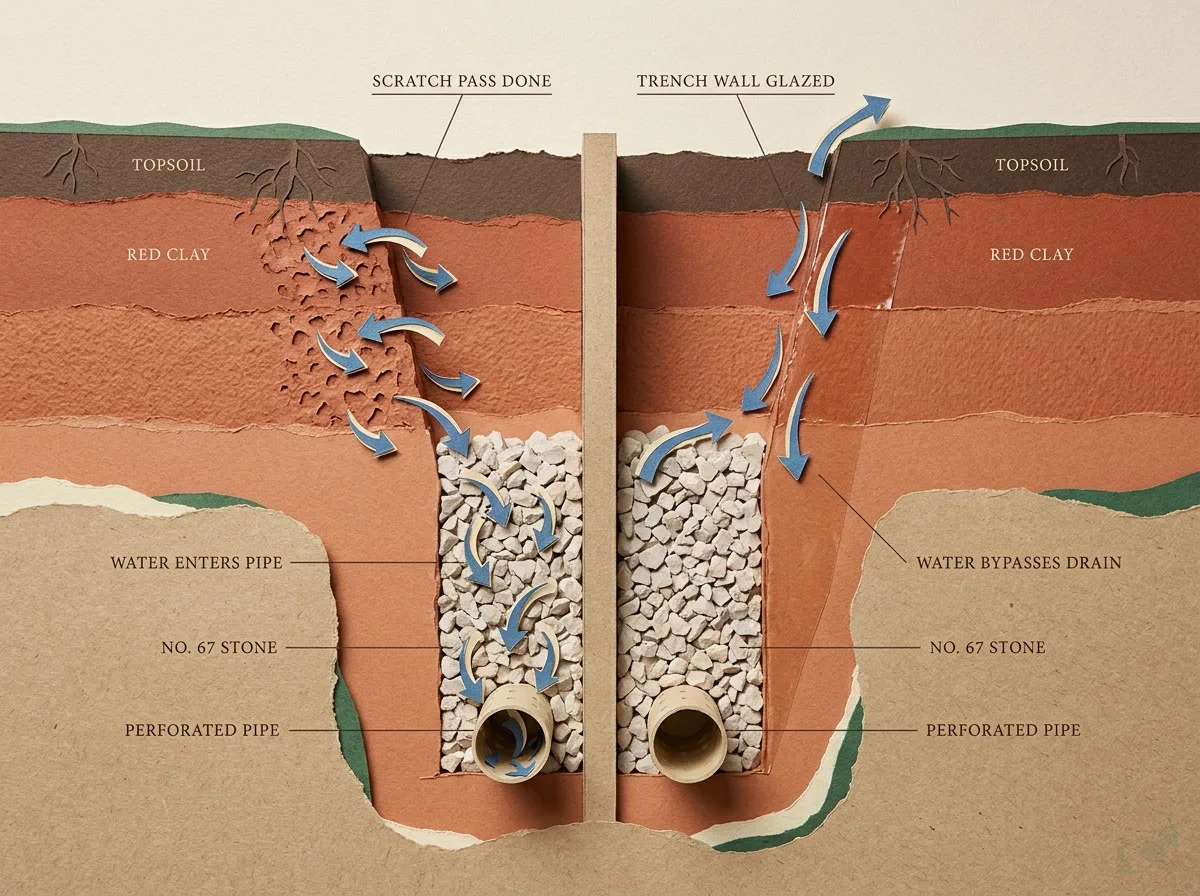
NC clay trench-wall prep: scratched walls vs a glazed cut
Comparison. Scratch pass done: Trench wall raked to break the clay glaze; Open clay pores let water enter the stone column; #67 stone and slotted pipe fill and work as designed; Adds about 20 minutes to a residential install. Trench-wall prep skipped: Excavator bucket smears the cut into a slick skin; Glazed wall seals the clay against water entry; Stone column sits in a cylinder of sealed walls; Water short-circuits out the top; pipe stays dry.
- Trench wall raked to break the clay glaze
- Open clay pores let water enter the stone column
- #67 stone and slotted pipe fill and work as designed
- Adds about 20 minutes to a residential install
- Excavator bucket smears the cut into a slick skin
- Glazed wall seals the clay against water entry
- Stone column sits in a cylinder of sealed walls
- Water short-circuits out the top; pipe stays dry
National-template crews skip the scratch pass because sandy soil never glazes -- in NC Piedmont clay it is the difference between a drain and a buried trough.
What to watch for: after the trench is dug and before stone goes in, the crew should run something along the walls. If they immediately start shoveling stone, ask whether they scratched the walls. The answer will tell you a lot.
Step 4: Fabric or No-Fabric Decision
In high-clay NC Piedmont soil, skip the trench-wrap fabric. Use a sock on the pipe. In sandy-transition zones, full trench wrap is appropriate.
The fabric debate is real. In sandy or silty soil, wrapping the entire trench in filter fabric keeps soil particles out of the stone column. In heavy clay, it does the opposite — the clay migrates into the fabric pores and seals them within one or two wet seasons. The drain becomes a lined clay tube.
The correct approach for Piedmont clay installs is a pipe sock — filter fabric wrapped directly on the perforated pipe only. It keeps soil out of the perforations without sealing the stone column.
For the full decision logic, including soil-zone transition cases where the answer is not clear-cut, see fabric vs no-fabric in NC clay.
What to ask: “Are you wrapping the trench or just the pipe — and how are you making that call?”
Step 5: Pipe Placement and Slot Orientation
Perforated pipe goes in slots-down in most applications — water enters from below, not through the top where soil pressure is higher.
There is a common misconception that slots should face up so the drain “collects” water falling in. That is wrong for subsurface French drain applications. The goal is to intercept groundwater moving laterally through the soil at depth.
With slots down, water rises through the stone column from below and enters the pipe through the lower perforations where the hydraulic head is highest. Slots-up orientation puts the openings where soil load is greatest and where fine material is most likely to clog entry points.
Some operators specify slots at the 4-o’clock and 8-o’clock positions as a compromise. Either is an improvement over slots fully up.
Pipe material choice — versus corrugated — also matters for NC clay installs. See PVC vs corrugated pipe for French drains for the full comparison.
What to ask: “Which way are the slots going in, and why?”
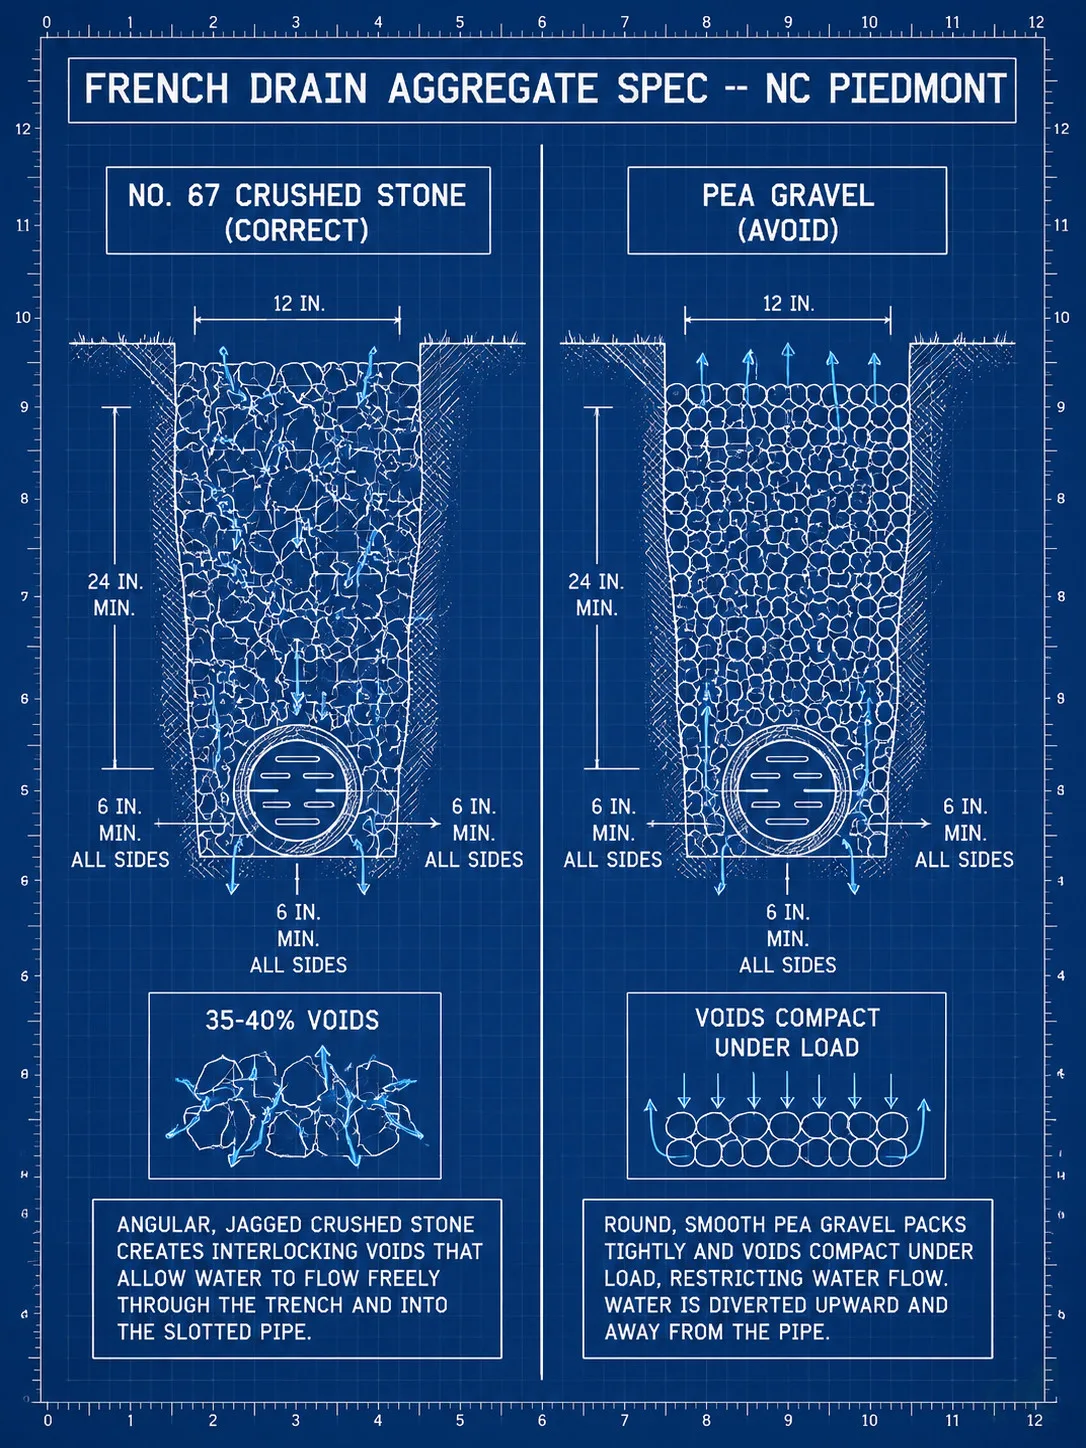
Step 6: Stone Column
#67 crushed stone, minimum 6 inches on all sides of the pipe. No pea gravel, no river rock, no leftover base material.
The stone column does the actual drainage work. It creates the void space that water travels through before entering the pipe. The aggregate spec determines how fast and how reliably that happens.
#67 stone is 3/4-inch washed crushed stone. Its void ratio — roughly 35 to 40 percent — allows water to move quickly. Pea gravel is round and smooth, which sounds like it would drain better but actually packs tighter and has a lower void ratio under load. River rock is inconsistent in size and often unwashed. Leftover crusher run or ABC has fines that fill voids within one rain event.
Six inches of #67 stone on all sides of the pipe is the minimum for a functional stone column. Less than that and you are relying on the pipe alone, which defeats the purpose of the surrounding aggregate.
Step 7: Backfill
Backfill goes in lifts with compaction between lifts. Loose clay backfill settles unevenly and can kink the pipe.
A lift is a layer of backfill material — typically 6 to 8 inches — placed and compacted before the next layer goes in. Compacting between lifts prevents the differential settlement that causes pipe deflection.
If the crew dumps all the backfill at once and runs a plate compactor over the top, the clay around the pipe settles at a different rate than the clay above it. Twelve months later, the ground above the trench has a visible depression. Eighteen months later, the pipe has a low spot that holds water and never drains.
The depression is the visible sign. It appears as a straight-line dip in the lawn along the trench path. If you see this on your property after an install, it indicates the backfill was not placed in compacted lifts.
What to watch for: look for deliberate layering with compaction passes between additions.
Step 8: The 48-Hour Rain-Check
A rain-check is a post-storm site visit to confirm the system is draining correctly. If your contractor does not do one, ask them to — or come back for one after the first significant rain.
This is the step that separates accountable contractors from ones who cash the check and move to the next job.
A rain-check happens after the first significant storm — usually 0.5 inches or more — following installation. The contractor (or the homeowner, if the contractor won’t come back) checks three things: water is exiting at the daylight point, no surface pooling is forming over the trench, and the area the drain was designed to protect is drying within a reasonable period after the rain stops.
If no water is exiting the daylight point after a significant rain, one of two things is true: the system isn’t intercepting the water it was designed for, or the discharge is blocked. Both need immediate follow-up.
What to ask before signing: “Will you do a rain-check after the first significant rain, and how do I contact you to schedule it?”
A contractor who won’t commit to a rain-check is telling you something.
Three Common Mistakes NC Contractors Make
Most French drain failures in North Carolina trace to one of three installation shortcuts. All three are preventable.
Skipping trench-wall prep. The most common NC-specific failure. The glazed clay wall blocks lateral water entry, the stone column never fills properly, and the drain underperforms from day one. The homeowner has no way to see this from the surface — it only shows up in the next heavy rain.
Using pea gravel instead of #67 stone. Pea gravel is cheaper and easier to source from big-box suppliers. It looks similar to #67 crushed stone to an untrained eye. Under load, it compacts tighter and drains slower. A French drain with pea gravel aggregate will often work adequately for the first year and fail progressively as the aggregate settles.
Skipping the 48-hour rain-check. The easiest shortcut to take because the homeowner never asks for it. The risk is that a system error — wrong discharge location, underdepth trench, inadequate slope — goes undetected until the problem has damaged a foundation, flooded a crawl space, or eroded a yard.
For a broader look at what goes wrong on NC installs, see common French drain DIY mistakes.
Questions to Ask Before the Crew Starts Monday
Copy these three questions and have them ready before the crew touches the ground.
1. “How are you prepping the trench walls before stone goes in?”
The answer you want to hear: “We do a scratch pass to break the clay glaze.” Any other answer — or a confused look — tells you they are working from a national template, not NC clay experience.
2. “What aggregate spec are you using — and why not pea gravel?”
The answer you want to hear: “#67 crushed stone, 6 inches on all sides.” Anything else — pea gravel, river rock, crush and run, ‘drainage gravel’ — ask them to specify the NCDOT aggregate designation.
3. “Will you do a rain-check after the first significant rain?”
The answer you want to hear: “Yes, here is how to reach me to schedule it.” If they have never heard the term or say it is not necessary, that is your signal.
These are not trick questions. A contractor who has installed French drains in Piedmont clay will answer all three without hesitation. If they can’t, find a grading contractor in North Carolina who has.
Connecting This to the Broader French Drain Picture
This page covers installation process — what the crew does and how to evaluate it. It is one of several pages in the French drain systems NC cluster.
Related pages in the cluster:
- French drain depth by application NC — how deep to go for yard intercepts vs foundation drainage vs driveway edge drains
- French drain slope minimum NC — the 1% rule, when to go steeper, and how to check slope after install
- Fabric vs no-fabric in NC clay — full decision logic for the trench-wrap vs pipe-sock call
If you are ready to talk to a contractor, hire a verified NC grading contractor in the directory. Each listing links directly to the contractor’s North Carolina licensing board record.